Know the basics of HTML and how it works within the client-server model.
Set up the tools you will use for the rest of the course.
Edit your first web page with Dreamweaver (or Visual Studio Code).
Publish this web page with GitHub.
Contents of this part
This first chapter brings you theoretical knowledge into how the web works.
In “What is a web page?”, you will learn how the client-server model works on the web, what the difference between “web” and “internet” is, and what a programming language is.
The section on Cybersecurity & Privacy gives you tips to stay safe online and explains what cookies are.
Next, you learn how to set up the software tools you need and retrieve the template for your resumé.
This might be the first HTML file you are working on. Section 1.5 explains how the HTML language is structured.
Once you are more familiar with the language, the final section is where you edit your resumé and publish it.
Do the work, step by step
This is a very brief overview of the tasks you will have to do to complete the first workshop. Items 1 to 4 of the list below are explained in detail in section 1.4 and items 5 to 7 in section 1.6.
Install the tools: GitHub Desktop and Dreamweaver (or Visual Studio Code).
Create a GitHub account
Clone the résumé template into a repository your GitHub account.
Synchronize this repository with your laptop.
Edit the code to write your own name with Dreamweaver (or Visual Studio Code).
Publish it onto GitHub pages.
Visit your very own page, anywhere and on any device!
A web page is a document written in the HTML programming language.
When you load a web page, your computer (client) will ask for this web page.
Your browser will read the HTML code and turn it into a beautiful-looking page.
The web is not the internet
The word “internet” is used to describe the whole infrastructure connecting computers and other devices around the world. It is the direct descendant of academic and military networks developed in the United States in the 1960s and 1970s.
Multiple services run on the internet, including email (which has existed since 1971). The web (short for “World Wide Web” or WWW) is another of these services.
The World Wide Web has been created in 1990 by Tim-Berners Lee and his colleagues to share information within the European Organization for Nuclear Research (CERN) in Geneva.
The web is based on a series of technologies: The Hyper-Text Transfer Protocol (HTTP) to retrieve pages from web server, the Hyper-Text Markup Language (HTML) for describing pages (see below), etc.
Servers and Clients
A server is a computer connected to the internet that will provide information upon request.
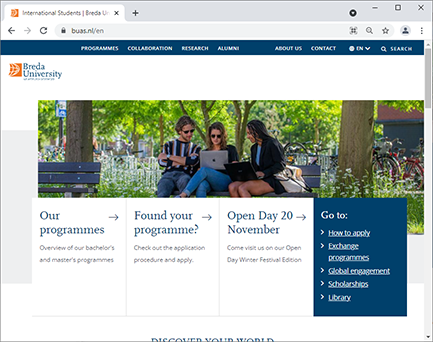
For example, a Domain Name Server will provide the translation between host names (e.g. www.buas.nl) and IP addresses (e.g. 83.96.243.158)
A web server will be providing the content (HTML pages, images, videos, etc.) that you see when visiting a web page
A computer asking information to a server is called a client
Web browsers
You can open web pages, including this one, with a category of app called a web browser.
The most commonly used browsers are Google Chrome and Apple Safari. You can check how common browsers are on Statcounter GlobalStats.
Since 55% of web visits in the Netherlands come from mobile phones, you must make sure that your website works on very small screen sizes.
Programming languages
A programming language can be defined as a formal language comprising a set of instructions that produce various kinds of output.
For example, in HTML (HyperText Markup Language), the code that you will write produces the visual aspect of a web page.
Other languages used commonly on the web include:
CSS (Cascading Style Sheets), which is used to bring styling to your page: Use it to fine-tune the layout, colours and fonts of your pages.
JavaScript (also known as JS), which is used to bring bring interactive features to your pages.
HTML, CSS and JS are languages that your web browser reads (or “inteprets”) to display web pages. You can always see the source code for a web page by using the Developer Tools (Press F12 on Windows or Command+Option+I on a Mac).
There are other programming languages that run on servers and whose role is to show HTML pages that will be different each time you visit them – this is the case of social media feeds and news websites. An example of a popular server-side language is PHP (which stands for Personal Home Page)
Based on other definitions, you might read elsewhere that HTML isn’t a programming language, since it lacks some features (e.g. writing algorithms).
What happens when you ask for a web page?
Computer user
Hi, Browser! Can I have a look at the page at www.buas.nl?
Browser
Sure, just wait a second, I need to make a few server requests!
Browser
Hi, DNS server! Can you tell me where www.buas.nl is?
DNS Server
Yes, the IP is 83.96.243.158
Browser
OK, now I’ll get in touch with that web server.
Browser
Hi, Web server! Can you give me the home page for www.buas.nl
Web server
Here’s some HTML code
<!doctype html><html lang="en"><head><meta charset="utf-8"><title>Breda University of Applied Sciences</title></head><body>…
Browser
Thanks, Web server! Based on the code you sent me, I will also need some stylesheets and some images so I can make it look nice
Web server
Here you are!
…
Browser
I’ve got everything now, I can render the page for the user!
Browser
Hello again, computer user, here is the page you asked for:
Computer user
Thanks, this looks great! Now I will click on “Our programmes”
Browser
OK, I’ll fetch the page at www.buas.nl/en/programmes
1.3
Cybersecurity & Privacy
Summary
Always use secure, encrypted connections.
A password manager is the best way to ensure you are using safe passwords.
Be mindful of the traces you leave online.
Tip #1: Use secure connections
A secure connection is a connection between services, computers and/or people where the contents can only be accessed by the legitimate participants in the connection. This is generally achieved through the use of encryption, where only the receiver of messages has a “private key” and can decrypt or decode the content of the messages.
This is an example of a coded message using the ‘Caesar Cipher’:
V ybir UGZY naq gur Jbeyq Jvqr Jro. Pbqvat vf sha.
When visiting a website, make sure that there is a lock sign in the address bar. This means you are using the secure version of HTTP (HTTPS). If you are using the unsecure version, never enter a password or a credit card number.
WiFi connections that do not have a lock sign and/or do not require a password are not secure, therefore computers located on the same WiFi access point can read what goes into and comes out of your computer. This means you should avoid the Guest network at University.
Use message apps that provide end-to-end encryption, such as WhatsApp or Signal. The main difference is that the first one belongs to a big for-profit company, and the second one is supported by donations.
Tip #2: Use a password manager
Passwords are very hard to use properly. You should:
Use passwords that are hard to guess or to crack. Hard to guess meanst hey should not include any personal details or be words that can be found in a dictionary. Hard to crack means that they should be long, so testing all combinations is too long for a computer to do in a reasonable time.
Never reuse the same password twice: If a password is breached from a website or app, then the attackers will try to use it on other popular platforms.
…and of course, you should try to remember these passwords, which is very complicated given the criteria above, and the very peculiar requirements that some services have (e.g. there should be at least one capital letter and 2 special characters from a specific list).
This is why it is extremely hard to manage your passwords well unless you use a password manager. Web browsers will manage your passwords, as well as Keychain on MacOS, but we recommend that you use a dedicated app, such as KeePass, Lastpass, 1Password or Dashlane
Bonus tip: Some services provide the option for Multiple-Factor Authentication (MFA) which add a layer of security since you’re not relying only on passwords. MFA generally uses one-time authorization codes which can be sent by SMS, generated in dedicated apps (this includes some password managers) or printed on paper and stored in a safe place.
Tip #3: Back up your files
Don’t risk losing your files. Back them up in more than one place
Cloud services can synchronize your files automatically and without any effort. Cloud providers generally use more than one location to store your data for additional safety. With your University email address, you get 1TB for free on Microsoft’s OneDrive. Competitors include Apple’s iCloud, Dropbox and Google Drive.
External hard drives have some additional advantages in terms of longevity and safety: They’re a one-time investment where you do not need to renew your subscription. Also, if you unplug them and store them in a drawer, they cannot be remotely hacked.
Tip #4: Think of what you reveal about yourself
Your online presence is an integral part of who you are. Whether you do it to apply for a job, keep your loved ones updated, or to meet new people, you will need at some point to publish personal details about yourself.
Be aware though, that some of these details can be used for malicious purposes. Think of the following examples:
The background in a photo can be used to find out where it was taken.
An EU Covid Green Pass, a boarding pass or a train ticket in the QR code format may contain your name and date of birth.
Birthdates are commonly used as PIN codes, so someone who knows your birthday may try to unlock your phone.
Some of your details might be available for sale due to data breaches. This happened to my bank account number after I bought event tickets from a website that was attacked.
Someone who knows enough details about you might try to call your bank or your phone provider and pretend to be you so they can reset your password and gain access to your accounts.
What are cookies?
Cookies are small pieces of data that your browser receives when visiting web servers. There role is to keep information about you when you return to the same website. Without cookies, you would have to log in again every single time you visit the same website again, and you would loose your shopping cart just by closing a tab or visiting another website.
But this useful technology is also abused for tracking purposes, thanks to what is called “third-party cookies”. Everytime you visit a web page that contains third-party content, which can be advertisements, analytic tools such as Google Analytics, or a like button from social media, then this content can also send your browser a cookie. This allows companies such as Google and Facebook to track your activity across multiple websites that you visit, and collect way more information about you than you might know.
You can also make delicious cookies by mixing 125g of butter, 180g of plain flour and 55g of sugar, and cooking for 15 minutes at 180°C.
Resources about Security and Privacy
The following organizations provide information about these topics, as well as resources and tools to help you stay safe:
The Electronic Frontier Foundation (EFF) is an international civil liberties organization. They provide the Privacy Badger extension which you can install on your browser to reduce your exposure to tracking technology.
Bits of Freedom is a similar organization operating within the Netherlands. In particular, they provide the Fix je Privacy toolkit.
Install a web editor such as Dreamweaver (or Visual Studio Code).
GitHub is a version control system. Create an account and download the desktop app.
Copy the template repository, then use GitHub Desktop and Dreamweaver (or Visual Studio Code) to open it on your desktop.
Editing text
Whether it’s HTML, CSS, JavaScript or other programming languages, creating code generally starts with typing the code using a text editor.
A basic text editor, like Notepad on Windows or TextEdit on MacOS, will only show you the source code, with no hint.
Advanced text editors, such as Sublime Text will help you visualize the structure of the code, by showing different parts of your text in different colours.
What your code looks like in an advanced text editor (e.g. SublimeText or Dreamweaver)
An Integrated Development Environment (IDE) such as Adobe Dreamweaver or Visual Studio Code, will go several steps further and offer the following helpful features:
Showing the result of your code in real time.
Showing errors in your code.
Offering suggestions and autocompletion when you type code
TIP: If you use Visual Studio Code, make sure you install the Live Preview Extension so you can see your changes in real-time when typing your code.
What is version control?
In this course, you will use a version control system named GitHub. The role of version control is to keep track of all changes in your files. In practice, these are the benefits of using version control:
You can go back and forth in time within a file’s history and see what was changed at each point.
You can easily undo changes if you are unhappy with them, even after days or months: You no longer need to keep several copies (e.g. work_final.html, work_final_v2.html) since this is all managed by GitHub.
You can synchronize and backup your work with the cloud or with another computer.
You can collaborate with your peers and see what changes they’ve made.
Does this sound familiar? Office 365 and Google Docs offer all these features. The main difference with Git is that, while Office and Docs will synchronize your changes automatically as a background task.
Version 1 by Alice
1
<h1>Heading</h1>
2
<h2>Sub-heading</h2>
−
3
<p>First paragraph</p>
Version 2 by Bob
1
<h1>Heading</h1>
2
<p>First paragraph</p>
3
<p>Second paragraph</p>
+
An example showing two versions and changes between versions, line per line.
What is GitHub?
GitHub, founded in 2008 and bought by Microsoft in 2018, is a platform built around version control. It is:
A place where you can host your code and synchronize it with your laptop.
A place where you can host your website and let the rest of the world visit it (with GitHub pages).
The biggest library of computer code, with both publicly available (open source) code and private organization hosting projects on the platform.
A social and professional platform, with 40 million users, many of which use it to showcase their coding skills.
A toolkit, including a Desktop app that you will install on your laptop, and tutorials where you can learn about all features of GitHub.
Definitions
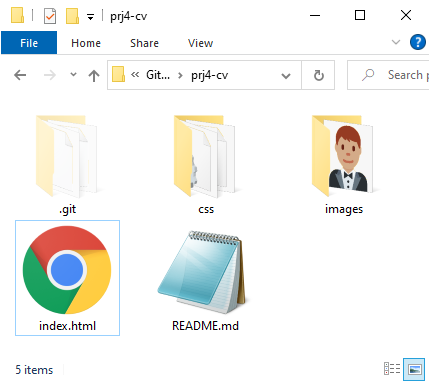
A Repository is a folder that is being synchronized on GitHub. Generally, a repository will correspond to a project, for example a website. Each repository can be accessed by typing github.com followed by the name of a user or organization (e.g. buas-media-interactive) and then the name of the repository (e.g. prj4-cv). The URL for the prj4-cv repository is therefore https://github.com/buas-media-interactive/prj4-cv
GitHub Desktop is an app that you will install on your Desktop. You will use it to synchronize your work between your laptop and the GitHub platform. It lets you track your changes even when you work entirely offline.
This will generate a repository within your own account — this repository is a copy of the one used.
Open GitHub Desktop on your computer. Find the “clone repository” option and clone your repository. This will create a new folder on your laptop. Take note of where it is.
Open the folder with Explorer (on Windows) or Finder (on MacOS). Have a look at the folder structure.
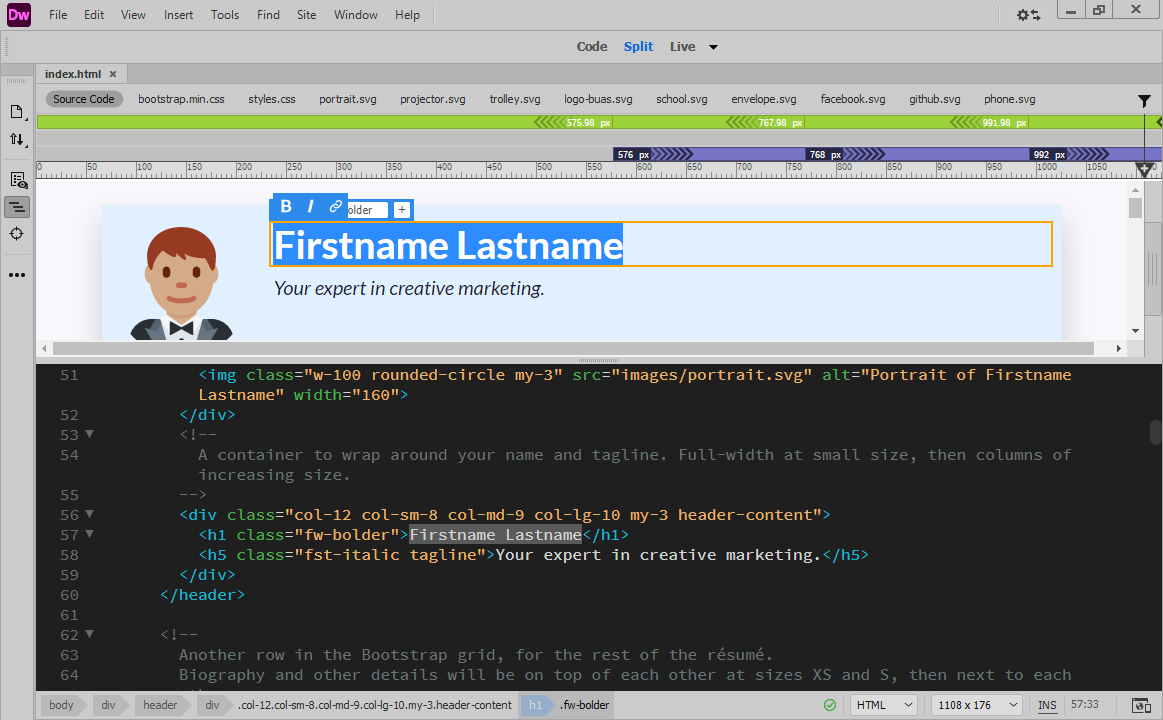
Open index.html with Dreamweaver.
In the next section, we explain how the structure of this HTML document works. In the final section, you will be editing the file and publishing it.
WARNING:
The biggest difficulty is making sure that you're always working on the right files. You only need to keep one copy of the files on your laptop at a given time, and you need to make sure that Dreamweaver is pointing at these files.
What you should get…
The prj4-cv repository as seen in the Windows File ExplorerThe index.html file as seen in Dreamweaver
HTML uses a specific syntax to define the structure of elements in a page.
An element can contain other elements, called children. This forms a family tree, also known as DOM Tree.
Elements can have attributes, including “ID” and “class”.
A simple HTML element
This example shows a simple paragraph element, made of three parts:
An opening (or start) tag, <p>
The content of the element, Hello, world!
A closing (or end) tag, </p>
The name of the element, P stands for “paragraph”
Code:
<p>Hello, world!</p>
Result:
Hello, world!
Structure:
Nested elements
In this second example, we create a new element inside the paragraph (p element).
This element, strong, makes its content bold.
The strong element is a child of the p element.
Code:
<p>Hello, <strong>
world</strong>!</p>
Result:
Hello, world!
Structure:
Self-closing elements
Some elements do not contain any text and therefore do not require any closing tags.
This is the case for br (the line break element) and for img (the image element).
Sometimes, you will see these elements written with an additional slash: <br />
Code:
<p>Hello, <br>
world!</p>
Result:
Hello, world!
Structure:
Attributes
In addition to the tag name (e.g. p), an opening tag can also contain attributes.
Each attribute starts with an attribute name, followed by the equal sign (=) and then, the value for the attribute.
In the first example, the name of the attribute is id and the value is “my-id”
This example shows three common attributes:
id identifies a unique element within a page. You cannot use the same value for an id more than once in the same page. ID has an additional benefit: If you add #my-id to the URL of this page (You can click here to try), it will scroll here directly. This is also how all internal links within the current page were made.
class is a way of identifying elements that share common characteristics. This will be very useful in Part 3, where we learn about.
style allows you to change the aspect of an element. This will also be covered extensively in Part 3.
A simple paragraph like the one we’ve been showing so far is not sufficient to be considered a full, valid HTML page. The following elements are also required.
A <!doctype> declaration (which is not considered an HTML element).
An <html> element which contains everything and is also called the root element.
A <head> element which contains metadata that will not be directly displayed in the browser frame. This in turn includes, among others:
A <meta> tag which gives information about the characters used. If you ever see accented characters replaced by other characters (e.g. überhaupt instead of überhaupt), the issue is probably located here.
A <title> element which contains the title of the page, as shown at the top of the browser window (PRJ4 | Part 1: Publishing your first page in this case), and in search engine results.
Immediately below the <head> comes a <body> element, which contains everything visible in the frame. There should be no other elements within <html>
You now need to use Dreamweaver to edit your resumé
And then you publish it with GitHub
Synchronizing GitHub
As discussed in section 1.4, GitHub will let you track your changes and publish them. One important point to notice is that you are in control of the following:
Which changes you want to track (this is called committing in GitHub).
When, and in which direction you want to synchronize them (this is called pushing when going from your laptop to the cloud and pulling when going the other way round).
Therefore, commit, pull and push are three different actions within the GitHub Desktop app that you need to do in sequence.
What you do in GitHub Desktop is also independent from when you decide to save files in your text editor, so saving files is an additional essential step.
Whenever you want to keep track of changes you have just made, you need to first save the file in Dreamweaver and then commit the file in GitHub Desktop. This only tracks changes on your laptop without synchronizing them and you can do this entirely offline.
When you want to put a new version of your work on GitHub, whether the goal is to publish it or to allow your team mates to collaborate, you need to click on push in GitHub Desktop.
When someone (someone else, or yourself, but on another device) has made changes to the repository, and you want to retrieve these to your laptop, click on pull
You will notice that the URL for your published web page doesn’t include the name of the HTML file (index.html). This is a naming convention: when you ask for a page without specifying URL, GitHub Pages will understand that you are looking for index.html
If you use any other name, e.g. cv.html, you will be able to access it by adding this file name to the repository URL, i.e. by typing https://buas-media-interactive.github.io/prj4-cv/cv.html, but you won’t see anything at https://buas-media-interactive.github.io/prj4-cv/
Instructions
To follow the steps below, you must have completed the instructions in part 1.4 first.
In Adobe Dreamweaver (or another HTML editor), change all references to “Firstname Lastname” by your own name
Before going any further, save your files!
In GitHub Desktop, commit your files by clicking on the “Commmit to main” button. You must provide a short description of your changes.
At this point, your changes are still only on your laptop. You now need to push your changes by clicking on the “Push” button.
Clicking on “View on GitHub” opens a browser window and lets you see what is online. Check that all your changes have been uploaded to the cloud.
Now your resumé should be ready to publish. Go to the repository’s Settings, then to the Pages subsection. Choose the main branch as the source, then click on Save.
Wait a minute and refresh your browser window (using
F5
or the
button). You should now see the confirmation box below and the URL for your website. Click on the link and visit your first published website!
In the next three parts, you will build up on the skills you’ve just learned.
The next part will be all about editing the content of the page: You will learn the HTML language in more depth and you will learn how to manage your images for the web.
In part 3, you will change the aspect of your resumé by applying styles. You will learn an additional language named CSS.
The final part helps you go one step further for your group website and will give you tips on how to use Bootstrap.